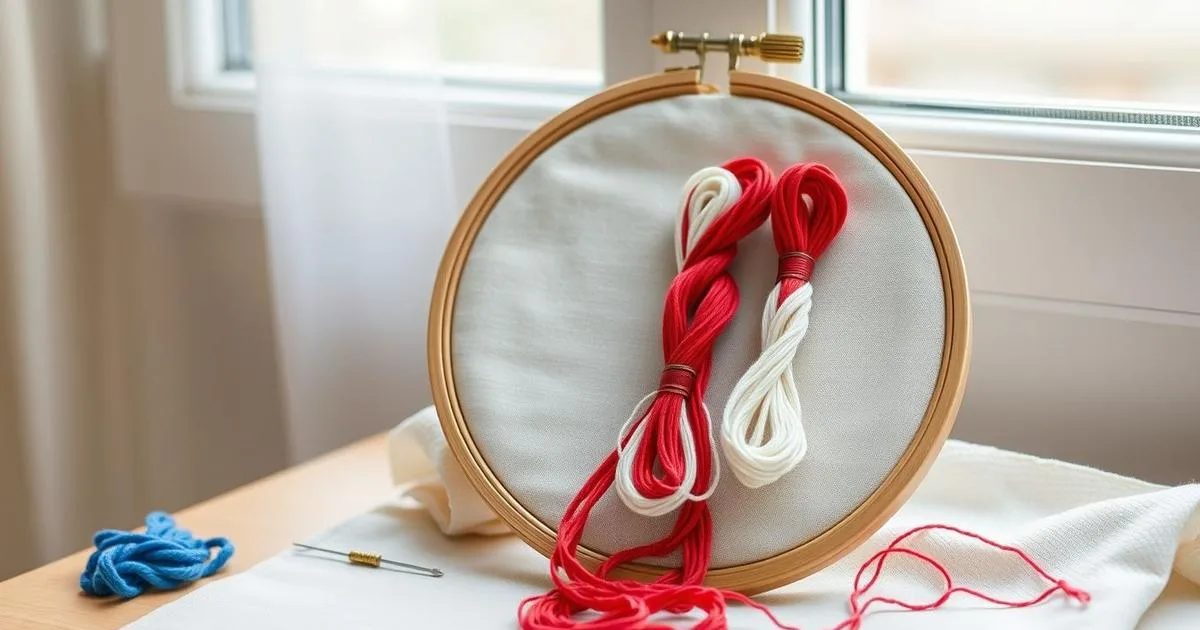
A cross-stitch chart is a map. Every square on the grid is one stitch, every color or symbol tells you which floss to use, and the whole thing is meant to be worked one square at a time. NASA's own cross-stitch activity for students says the same thing: the chart's grid "corresponds to the grid created by the weave of the fabric, and each colored square on the chart represents a cross stitch" (NASA, Aeronautics Cross-Stitch Activity, 2024). DMC, the thread maker, puts it simply: "A thread color key shows the symbols that correspond to each color" (DMC, How to Read a Cross Stitch Chart, retrieved 2026-10-29). Once you can read the key, the grid, the center marks and a few special stitches, you can pick up almost any chart.
This guide uses our own free flag chart as the worked example, because it is small and has only three colors. Our flag chart page gives finished sizes for 11-, 14- and 18-count fabric. WTCQuilt.com is the site that now hosts the 9-11 Memorial Quilt Project's story; see about this site for who we are and how the guides are made.
Key Takeaways
- Read the key first. It links each symbol or color to a floss number and says how many strands to use.
- One square on the chart is one stitch on the fabric. Heavy lines every 10 squares help you count.
- Find the center of the chart and of the fabric, and start there.
- Fabric count decides the finished size: our flag chart is 74 by 39 stitches, about 5.3 by 2.8 inches on 14-count.
WTCQuilt.com is an independent site. It is not run by the original 9-11 Memorial Quilt Project or its organizer, and it is not affiliated with any memorial, family group or agency.
Start with the key
Before you look at the picture, find the legend. A good key lists each floss by brand and number, shows the symbol or color used on the grid, and says how many strands to stitch with. The Embroiderers' Guild of America, in a beginner manual from its Fort Worth chapter, says each color used "will have its symbol," found in the chart key (EGA Fort Worth chapter, Introduction to Cross Stitch, 2024). Many keys also list the number of stitches per color and the finished size on different fabrics.
Because the key is the only thing that says what a symbol means, never carry a habit from the last chart into this one.
Our flag chart mixes two ways of showing a stitch. Three colors are drawn as filled squares, and the key matches each to a floss:
- red, DMC 321
- white, DMC Blanc
- blue, DMC 796
The fourth key line is the only symbol. A white square marked with an asterisk (*) is a star, meaning one white cross stitch inside the blue field, called the canton. You will see this pattern often: colors for the bulk of the design and a symbol for the small details.
The grid, one square at a time
Each square is one full cross stitch, and each stitch covers one square of the fabric's weave. Aida cloth makes this easy because, as Wikipedia puts it, it has "a plainly visible grid of squares with holes for the needle at each corner" (Wikipedia, Cross-stitch).
Counting single squares across a wide chart is slow and easy to get wrong, so charts add heavy lines. DMC says larger grid lines make it easier to "count blocks of stitches," and the Embroiderers' Guild of America manual says heavier lines are "usually every 10 counted spaces apart." Our chart follows that convention, and its edge numbers (10, 20 and so on up to 70 across the top, 10, 20 and 30 down the side) tell you which block you are in.
A small habit saves a lot of ripping out. Count the squares from a heavy line, not from the edge of the chart, and count again on the fabric before you commit the stitch.
Find the center and start there
NASA's activity guide puts the usual advice plainly: "It is often recommended to start with the middle of the design and work your way outwards" (NASA). Starting there lands the design centered on the fabric. DMC tells stitchers to follow the four arrows on the design: "where they all intersect is the center point." For the fabric, DMC says to "fold your fabric in half and then in half again, where the two folds intersect is the center" (DMC, How to Prepare Fabric for Cross Stitch, retrieved 2026-10-29). The Embroiderers' Guild of America manual gives the same method and, for the chart itself, shows the arithmetic: on a 50 by 50 chart the center is at 25 across and 25 down.
The flag chart shows why this matters. It is 74 stitches wide, which is an even number, so there is no single middle column. The center falls between the 37th and 38th stitch across. Horizontally that point is well to the right of the blue canton, which is only 27 stitches wide. If you eyeballed "the middle of the flag" you would probably start in the wrong place. Our chart has edge numbers instead of center arrows; each number sits over the 10th, 20th or 30th stitch, counting from 1 at the top-left corner. So count: the 37th and 38th stitch across, and for height (39 rows, an odd number) the 20th row, which sits inside the seventh stripe.
Starting from the center also gives you an even margin on all four sides. That matters when the square will be sewn into a quilt, as in our guide to stitching a memorial square, because the quilter needs spare fabric to work with. The Embroiderers' Guild of America manual makes the same point: the chart is sized only for the stitching, so add room to your fabric for finishing.
Walking through the flag chart
Here is what the chart contains, counted from the file itself (the site's own flag chart).
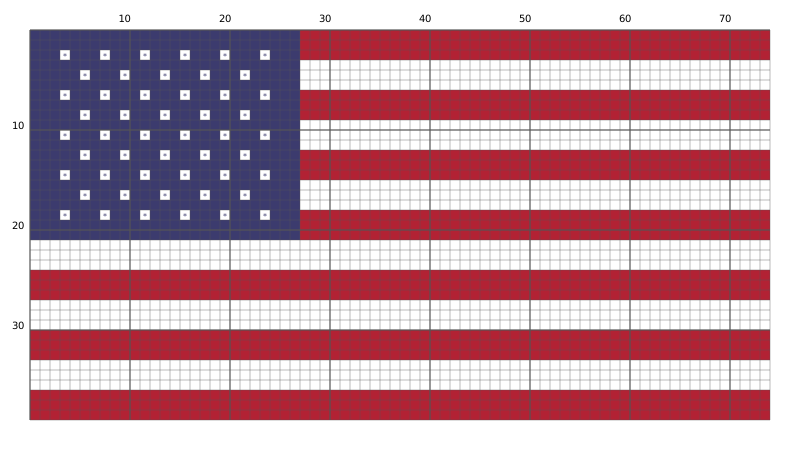
The whole design is 74 stitches wide and 39 tall. That is 2,886 stitches in total: 1,230 red, 1,139 white and 517 blue. The white count includes the stars.
The stripes are the easy part. There are 13 of them, each 3 stitches tall, which is how 13 stripes become 39 rows. The top stripe is red. The lower six stripes run the full width of the flag. The upper seven run only beside the canton, 47 stitches wide.
The canton is 27 stitches wide and 21 tall, which is exactly seven stripes' worth. The 50 stars are a repeating pattern. Starting on the third row of the blue, every other row carries stars: rows with six stars alternate with rows of five stars. That makes five rows of six and four rows of five, which adds up to 50. The stars in a six-star row sit every fourth stitch across, and the five-star rows are offset by two so they fall between them.
This is the real skill in reading any chart: seeing the repeat. Once you spot that a star row is "white, blue, blue, blue" over and over, you stop reading square by square and start reading rhythm.
If you stitch the blue first, leave the star squares empty and fill them with white afterward. That is the order our flag page suggests, and it keeps the whites clean against the blue.
Marks beyond full crosses
A chart can carry more than full cross stitches. DMC's chart guide says a symbol that fills its whole square means a full cross stitch, and it names the others (DMC, How to Read a Cross Stitch Chart):
- Backstitch, "generally used as outlining or lettering." On the chart it is a straight or dotted line joining two corners of a square.
- Half stitches, quarter stitches and three-quarter stitches, which DMC groups together as "fractional stitches." A half stitch is one diagonal, like half of an X.
Our flag chart uses none of these, which is one reason it suits a first project. If you want to add a date or a name under the flag for a remembrance piece, that lettering would be a backstitch job.
Keep your place
DMC notes that many stitchers print a black and white copy of the chart and "use a highlighter to color in each block of stitches or row" so they know where they are (DMC). Working from a copy also keeps the original clean. On a stripe design like the flag, highlight a whole row once you finish it rather than marking stitch by stitch.
From chart to fabric: size by count
The chart is fixed. The fabric decides how big the stitched piece comes out. Fabric count is threads per inch, and Wikipedia (Cross-stitch) gives a handy example: a 28-count fabric stitched two threads over two finishes the same size as 14-count Aida worked one over one.
The finished size is the stitch count divided by the fabric count. For the flag chart:
| Fabric | Finished size | Bare minimum (flag page) | With a 3-inch border |
|---|---|---|---|
| 11-count Aida | 6.7 by 3.5 in | 12 by 9 in | 13 by 10 in |
| 14-count Aida | 5.3 by 2.8 in | 11 by 8 in | 12 by 9 in |
| 18-count Aida | 4.1 by 2.2 in | 10 by 8 in | 11 by 9 in |
| 28-count evenweave, over two | 5.3 by 2.8 in | 11 by 8 in | 12 by 9 in |
The bare minimums come from the flag page and leave only about 2.5 to 3 inches on each side. DMC recommends "a clear border of at least 8cm/3inches all the way around your design," and the memorial-square guide asks for the same 3 inches on every side. The last column adds a full 3 inches to each side of the finished size and rounds up to the next inch, so cut to that if you can.
If your group project gives a size for every square, work backward from it, and follow the organizer's guidelines whenever they differ from anything here. The sizing and thread tips on the flag page go further. How to make a memorial quilt covers what happens to the squares afterward, and the gallery of stitched squares shows finished work from the original project. Questions or corrections? Contact us.
Questions people ask
Do I stitch the squares in any order?
Mostly yes, as long as you stay on the grid. Many stitchers work one color at a time, and others finish one block of the chart before moving on. Wikipedia names both approaches, the "cross-country" method and the "parking" method. For the flag, the blue field first is sensible because the stars need to fit in.
What if my chart uses symbols and I can't tell them apart?
Print it larger. A chart on screen can hide the difference between two similar symbols, and the key will list each one by floss number. If two symbols still look alike at any size, ask the chart's designer.
Can I change the colors?
Yes, the chart is only a plan. Swap the key's floss for another and every square follows. On a memorial piece, though, a flag in its usual red, white and blue is what most people expect to see, and a square joined into a group quilt reads best when it matches its neighbors.
Sources
- DMC, "How to Read a Cross Stitch Chart": dmc.com, retrieved 2026-10-29. Color key and symbols, full cross stitch squares, backstitch lines, four center arrows, larger grid lines for counting.
- DMC, "How to Prepare Fabric for Cross Stitch": dmc.com, retrieved 2026-10-29. Finding the fabric center by folding, 3 inch border.
- NASA, "Aeronautics Cross-Stitch Activity" (EP-2024-12-657-HQ, 2024): nasa.gov, retrieved 2026-10-29. Chart grid matches the fabric weave, one colored square per stitch, symbols map to floss colors through the chart legend, start from the center.
- Embroiderers' Guild of America, Fort Worth chapter, "Introduction to Cross Stitch" (2024): egausa.org, retrieved 2026-10-29. One square per stitch, heavy lines every 10, chart key, center arrows, computing the center, adding room for finishing.
- Wikipedia, "Cross-stitch": en.wikipedia.org/wiki/Cross-stitch, retrieved 2026-10-29. Aida description, fabric count and the 28-count example, stitching methods.
- Chart counts and sizes are computed from this site's own flag chart (
flag-chart.svg, shown on the flag chart page).
About the author
April Hood is a quilter from Indiana.